Wednesday, December 22, 2010

YOGA series: E2- OHM


So here I am again, with the Yoga post series. this week I want to talk about OHM which is chanted in the beginning or at the end of Yoga classes (or both actually, seen all the 3 versions).
I am sure you all had affected by music at least once in your life. Music is a universal language and often it changes our mood. well OHM is a universal sound that brings us back to wholeness.

OHM symbol is a sacred syllable in Hinduism,  which I won't go into that, here. it is made up of three Sanskrit letters: aa, au and ma. 
There are so many different definitions and beliefs on this word. but I am personally aware and read about some.
One says that the vibration and movement that is caused in us by chanting OHM allows us to recognize the movement of whole universe( like setting and rising of the sun and moon, water in rivers and seas,and beating of our hearts). 
another one that I know is that OHM is an eternal sound that covers all in the past. present and future.  it is also believed that the sound of OHM covers all the sound in the whole world. 
Yeah there is a lot written about the ohm,  but easiest way to understand it is to actually do it.  
So close your eyes, in a quiet place and let your body relax and release your mind from your daily stuff. then take a full breath and slowly let the air out from your mouth with a sound of "Au" which will goes to the sound of "o" as you continue. about half way through of your exhalation, start to close your lips; by doing this the sound becomes as "mmmmm" naturally. by releasing the last part of your breath you could feel the vibration inside your . over the time the practice will be improved and you could feel the vibration all over your body and try to go deeper each time.
Hope you enjoy , Namaste!


Sunday, December 19, 2010

Pineapple Torte

So this Saturday I was going through my recipes and looking for something exciting to bake, and I came across this one. I never made it before actually and  I gathered  notes of recipes a long long time ago! so have no idea where it is from.

Ingredients for the Cake:
Eggs: 7
Sugar: 7 tablespoon
Flour: 5 tablespoon
Ground walnuts: 10 tablespoon
Baking powder: 2 teaspoon

Preheat your oven to 350 F and cover the bottom of a  9 inch round pan with wax paper. separate the egg yolks and in a clean bowl mix the egg whites with sugar till stiff. add egs yolks one by one and mix in between. then add walnuts, flour and baking powder slowly till they are all mixed together. pour the batter in your pan and bake for about 30-35 minutes.

In meanwhile let's make the cream.

Ingredients for Cream:
Eggs :3
Corn starch: 2 tablespoon
Flour: 2 tablespoon
Sugar: 1 1/3 cup
Milk: 2 1/4 cup
Vanilla sugar: 6 teaspoon
Butter : 1 1/4 cup
Pineapple : sliced as much as you like

Put a sauce pan on the medium low-heat and heat the milk. mix eggs and sugar,add corn starch and flour and mix all with boiling milk. reduce the heat and mix the batter till the cream thickens. take off from heat and cool it down a little bit. cut butter to small cubes and add to the rest one by one and mix them well until nice and creamy.
Back to cake; now your cake in cooled down, cut from the middle. sprinkle the cake surface with pineapple juice. spread half the cream on the cake and cover it with completely with pineapple. then cover them with the rest of the cream. put the other half of the cake on top. you could use the same cream for the top of the cake or use white whipped cream.
cool down the cake for about an hour in a fridge and let the cream and pineapple taste absorbs to the cake ; then it is ready to serve. you could use any type of fruit you like ( pear, apricot, peach, you just name it).
Hope you try this and enjoy !
Mania

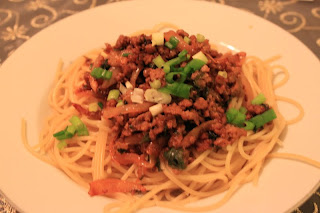
Spaghetti with Veal, Wine and Cream

One of my favorite food of all time is actually Pasta and any kind of meal from this family, but it had to be spacial. I am not a big fan of simple spaghetti and tomato sauce only. this is one the special ones for me. the inspiration comes from a recipe of " Tagliatelle with veal, wine and cream" from the book called "30 minutes meals, a commonsense guide". the original recipe used veal scaloppine cut in strips, white wine and at the end the sauce comes white . I made my own modifications to the recipe and had no idea how it would turn out at the end . but fortunately it  is was delicious, so hope you guys try it and enjoy it as well.  

Ingredients: 
( serves 4) 
Ground veal: 500 g
Chili powder: 2 teaspoon
Butter : 2 tablespoon 
Onion: 1 medium size sliced in long lean stripes 
Red wine: 1/2 cup
Tomato paste: 2 tablespoon
Salt: as much you like
Cooking cream: 2/3 cup
Spaghetti : 600g 
Italian Parsley : as much as you like
Green onion sliced and Parmesan cheese to garnish 

In frying pan add small amount of extra virgin olive oil with 1 tablespoon of butter ( the oil is to prevent the butter from burning). add the ground veal and chili powder and quickly fry till slightly browned. 
remove the veal from the pan or use another clean one, coat the pan with butter the same as before and add onion slices to the pan and stir till soft and golden. pour the tomato paste mix well and add the wine. cook rapidly to reduce the liquid. add salt, cream and parsley ,mix well for 1-2 minutes. 
Meanwhile, cook the pasta in a large sauce pan of boiling salted water till done. Drain well and keep it warm. serve the pasta with your meat sauce and garnish with green onion and Parmesan cheese. 
Enjoy!

Thursday, December 16, 2010

What is going on in my life in the last weeks of 2010 ....

Hello dears,
I kind of missed a lot of positing and I have several reasons for that. one of them ,  is that here, it is the end of fall semester and I worked as a TA for one bachelor course this semester. since now is the end, I have to correct all reports and prepare the final notes before holidays.
I live in Canada; however I study in French university so all the reports  are in French. reading those  is really time consuming for me compared to read them in English :(.
so most of the week I was stuck behind my computer and was reading reports make notes. I did not cooked baked or did anything special this week which makes me feel horrible; but I hoped by tomorrow I would be done with everything course related and could relax for bit.
I also did read 5 books in "pretty little liars" series which I will talk about them soon.
Oh and BTW it is been snowing here for almost a week now, I will post some pictures of it on my next post :)
so till next time, bye.
Mania
The view from our balcony, it was snowing :)

Wednesday, December 8, 2010

Products I won't repurchase series- E2: under eye cream

Hi , as I promised to myself I will talk about some subjects in series, and I will try to have a post for each once a week. so here I am to share something with you  in the subject of shopping and beauty stuff :)
Today the subject will be "under eye area: and in caring routine for that area what I got and tried and what are my thoughts on them.so here we go:


As you know, under eye area has a very delicate skin and it is important to be cared properly. the texture of this specific area is different from other parts of our face and if it does not receive the attention it deserves, it will get early wrinkles. also there were those times for every one of us that we could not get our perfect sleep, and in the morning the dark circles and under eye puffiness would be shouting our fatigue to the world !
So I tried to take care of it by trying to moisturize my under eye area more often; not only with my face moisturizer cream but with creams that were specified for under eye area.  


Olay Total Effects Eyes Transforming Cream:


I personally did not use much of Olay products except several of their face cleanser which I don't care about them that much ( big thumbs down) . But I saw this cream in our drugstore on special few months ago, and thought to give it a try. the cream claimed to be an under eye cream for reducing dark circles, depuffing and small wrinkles ( the ones that star to appear at late 20s).

So I got the cream and started using it, at least twice a day; one in the morning before I put my makeup and once before bed time. sometimes when I was at home during the day,  I reapply it again. 
The cream comes in small jar in very light pink color, and has a very soft texture. one of the good points related to this product is that it quite moisturizing and absorbs very quickly. thus  in case if you want to apply under eye concealer or any other products you don't have to wait till it dries up. 

The disappointing part about the cream was that except than being a good moisturizer, it does not do anything more there ; it does not do any type of transferring activities on that area as it claimed :(
So the days that I have a huge black shadow down there and want to cover it , I have to apply additional product there ( like concealer) . unless I am going to a party or something  I usually just skip that step. I work in the lab and the instruments that I hang out with  all day does not pay attention to my skin that much !

so those are my thoughts on this products and my reasons for not buying it anymore. I am going to try something else, after I finished this one.

Important notes:
Just wanted to mention this quick note ,since we are in the subject of "under eye area". As the skin under there is very delicate and sensitive ( oh ! how many times I mentioned that already ) when you apply any types of cream, or you want to remove your eye makeup, NEVER , I mean never rub the products with your fingers there, these would cause early wrinkles or even skin irritation.  so how to do it:
To apply a cream, put the product  on the skin surface and just dab with your fingers slightly to spread the product there.
To remove your make up ( using an eye makeup remover on the pad or the ready moisturized pads),  put one pad under eye ( just below your lower lash line) and close your eyes and put another pad on your eye area; just keep it there for few seconds and then very slowly move the upper pad to the side.  it will take the makeup and the downer pad and leave your eyes clean.
So till next time :)
Mania

Tuesday, December 7, 2010

International weekend in our kitchen , part 2: Chicken cordon blue

Here is the 2nd part of the post which is not in the dessert category. let me be honest , I am not big fan of food ( like actual meal), but I love dessert specially cakes. Once If I have to choose between a deliciouses cake and an actual meal, I would choose cake. I know, it is not normal and very very bad, but what can I do
My name is Mania and I am a cake person !
So I barely experience new cookings but in baking I am all open to new things.however when I saw this post on Juliet's blog (http://julietgabriel.blogfa.com/post-204.aspx) I couldn't resists and decided to make it on the weekend.

After doing a little bit of research on the history of this name and recipe, I found out that "Cordon blue" is the name of very famous cooking schools in Europe; teaching mostly the classic French techniques of cuisine and pastry  ( has branches every where and here in Canada too) and this title would be given to chef that achieved high levels. But it is not clear yet where the dish is originated, some of the countries like Germany, France and Italy have the same dish which is based on veal or chicken wrapped around stuffing, another meat, cheese or any combination similar to these, then breaded and fried. maybe it is because they replaced the usual meat for wrapping with chicken that they named it cordon blue!
So it could be from anywhere. enough with the history and let's cook some chicken cordon blue.

Ingredients :
These materials are enough for 3 complete chicken breasts, which turned into 6 chicken cordon blue.
Chicken breasts 3 pieces
Salami enough for 3 chicken breasts (Jambon or smoked ham is also fine)
Mixture of cheddar and mozzarella cheese for stuffing ( or any kind of cheese you like)
Mixture of bread crumbs and flour ( even each one by itself would be enough)
Eggs 1
Milk 1 tablespoon
Salt and pepper as much as you need
Butter (melted)   3 tablespoon
Oregano  1 teaspoon


First slice the chicken breast in half ( now each section is thiner). cover with plastic and beat it with a mallet or   a back of a cup. be careful not to beat too much to prevent from tearing down. 


Then cover the 2 sides with butter, salt, pepper and oregano. 


Now spread a slice of Salami ( Jambon or smoked ham) on the chicken, put cheese on it and roll the salami, then roll the chicken breast; and secure it with toothpicks. now put it in the fridge for a bout an hour. so the different flavors absorbs to the chicken.

In a clean dish mix the egg with milk; in another dish put the mixture of bread crumbs and flour. use one hand for the eggs and another for the flour to prevent any mess. (you could also push in the cheese that are coming outside )


Put the rolled chicken in the egg dish and cover it in the eggs completely; then transfer in the dry dish and cover it with the flour (with your dry hand).


Now fry it in the hot oil. till it is golden on every side.

In my opinion, this is one of those things that you can play around with. like add sliced vegetables ( like parsley) to the center with cheese; or instead of frying you could cook it in the oven (at 375 F for about 30 minutes or till it is done) and cover it white mushroom sauce ( or any kind you like and goes well with chicken).
Thanks Juliet and , Bon Appétit !  
Mania

Sunday, December 5, 2010

International weekend in our kitchen , part 1: Italian cake

This weekend I tried 2 new recipes, both were from (http://julietgabriel.blogfa.com). Juliet is such a talented girl and I just could go through her blog for hours, I really admire her talent and always think "oh how she can find time to do all these things!"
She writes in Persian but anyone can use her blog, thanks to Google of course :).So Juliet, thank you dear for sharing these wonderful and delicious recipes and wish you all the best.
The first post will be about the cake (part1). it is a simple cake which is originally from Italy; it requires 2 steps of baking: one for the cake itself and another for the chocolate topping. you could use any type of topping or nothing at all, your choice.as Juliet said in her post this is one of those cakes that are perfect as birthday cakes too. ( oh, here is the direct link of the cake from her blog :http://julietgabriel.blogfa.com/post-172.aspx)

Ingredients for the cake:
Eggs at room temperature  4
Milk at room temperature  1/2 cup
Vanilla 2 teaspoon
Flour 1 3/4 cup
Baking powder  2 teaspoon
Salt 3/4 teaspoon
Butter close to room temperature 16 tablespoon

First step like always is to turn your oven to 350 F and cover your pan with wax paper. in a bowl, mix eggs, milk and vanilla with electrical mixer at low speed for about a minute.
In a food processor mix flour, baking powder, salt ( which are sieved already) with sugar for very short time ( about 30 s). cut the butter in small pieces and mix them one by one with the rest of the dry materials at low speed.
mix one cup of the egg and milk mixture  with the rest of the materials in food processor for about 10 s. increase the speed slightly ( now at medium speed) and mix for a bout a minute. add the rest of the milk and egg mixture and mix for about 30 s. if some materials are still unmixed and attached to the side of the bowl, stop the mixing and add them to the rest with a spatula and mix for another 40s.
pour the batter in your pan and bake for about 25- 30 minutes, before taking out the cake test if it is ready by a knife or fork (you know how).
take out the cake from the pan and let it cool down. now lets make the chocolate topping.


Ingredients for chocolate topping:


Chocolate any type at your choice ( I used the semi-sweet baking chocolates, )  400 gr
Whipped cream 35%   1 1/2 cup
Honey 3 table spoon
Vanilla 1 teaspoon

Put the chocolates and cream in the cooking pan ( at low heat) till the chocolates are melted and mixed with cream. just be careful not to boil the cream. after they are mixed, remove from the heat and mix the honey and vanilla with them and mix perfectly for about 3 minutes ( with electrical mixer or non-electrical ones) . put the cream in the fridge for about an hour and every 15 minutes mix it so the cream thickens. after an hour you can mix the cream with mixer for about few minutes but mine was already thickened here and was ready.
By now your cake is completely cooled down. you could divide it to half, cover the between with cream and the put the top half on. then pour the rest of the cream on the surface of the cake.


So as a final note, I have no idea why this is called Italian cake, I tried and  look into some recipes of popular Italian cakes to find the exact name but could not find any that similar to these; still looking though. however if you make the cake you will see that the texture of the cake is the same as all Italian cakes. hope you make this and enjoy!
Mania

Friday, December 3, 2010

Products I won't repurchase series- E1: More volume on the hair please

I have a small thing with my hair. my hair is naturally flat, like flat flat, no volume what so ever. so I always like to get some volume up there, and absolutely not a cheesy one. I tried so many different products that have a little mention of volume on them, in the different categories shampoo, conditioner, mouse, cream, gel, spay.
some of them worked which I will talk about at the end of the post in my current hair routine section but most of them brought disappointment or just did not do what I expected from them. so here they are:


1- TRESemme 24 HOURS BODY shampoo and conditioner:
 I bought the shampoo and conditioner at the same time, and with the title and everything I was thinking oh that would give me a lasting volume, otherwise why they wrote it there!
I bought them on sale each for around 3$ which is quite good for the amount of the product you're getting. then started to use it, nothing. I saw no difference at all from any non-volumizing shampoo. what the shampoo do, is try to get rid of the build up in your hair that reduces its volume, however it was getting rid of the good stuff in my hair too because after a while my hair started to look dry so I needed to use additional moisturizer to help the dryness. I was very very disappointed with those products. I looked the reviews and there are mix results so it is one of those products that give some people volume and give nothing to some.

I used half of the shampoo but little of the conditioner ( since I only use 1-2 pump of that). these 2 big bottles are  hunting me in the shower! so glad that I did not pay a lot for them, personally did not get good results from them.


2-MATRIX amplify volumizing system, thicklift liquid volumizer
This one is of those products that actually delivers what said. However my problem with it was that is is very thick. I applied it to towel dried hair and blow dried it, but by the time that I get to the top of my head, this thickens up and it is kind of hard to put the brush in my hair ( it made my hair hard and a piece of wood stick) . it gives you a good volume but not those kind of hair styles that you could run your fingers through cause you might get stock in there ;)


My current hair routine:
1- I use shampoos that has little bit of moisturizer in it, since my hair needs lots of it, but at the same time I don't want to get builds up in my hair since it reduces the volume. currently I am using "JOHN FRIEDA brilliant brunette"  shine release moisturizing shampoo. I will probably change it after it is finished and go to something else. I want to try PHYTO shampoo in the future.
2- I use "PUREOLOGY PURE VOLUME" hair conditioner. 
3- I put my hair in the towel and leave it like that for a while ( do other stuff in the meanwhile). after a few minutes I put "LIVE CLEAN ARGAN OIL" on my hair, focusing on the ends not the roots. 
4- Spray my hair with root-lifting product, currently "LA COUPE ROOT BLAST" texture and root lift spray . only in places that I want to get a little bit of volume ( just lift your hair and spray there) . since it is a spray, it is very light and you don't feel you have so much product in your hair. 
Then I use a heat protecting spray ( at this stage my hair is 90% dry) and  blow dry with a big round brush . 
5- If at the end I feel my hair has frizz in them I use one small pump of "L'OREAL EVER PURE SMOOTH FRIZZ-FREE SERUM" which is rarely. 

Hope it would be helpful to some people and wish you a happy, good hair day !
Mania

Thursday, December 2, 2010

What I am reading now...

I love love  reading, sometimes I prefer it over a lot of things like watching TV or even shopping. so most of times when I am waiting or don't have anything to do, I read a book.
I don't read specific books, since I think people should try to know and experience as much as possible.  so sometimes I read books that are very deep and requires deep thinking and analyzing, but sometimes books that are very easy to read and follow or those that are too cheesy !

A few weeks ago I started reading "pretty little liars" series. I know it is a TV series, but I  preferred to read the book instead of watching its shows, in most cases. why? because I think you create a much better show with your imagination.
It is a small book, and easy to read. the story is about a group of teenage girls that are friends with another kind of popular, cool girl called Ali. and all of them told Ali some dark secrets about themselves. However Ali disappears and nobody knows what happened to her. after 3 years each of the girls ( which now separated from each other)  receive  notes about their secret with Ali's signature on it and threats to expose their secrets. so there could be 2 theories, the missing girl is alive and now black mailing those girls, or there is someone else other that Ali, that knew about the secrets; which personally I think it's the last one ( dah).
there are some themes and behaviors  in the book that I am surprised they are  done by some teenagers  (like sex, drugs, drinking, bulimia and shoplifting) but that is how the society are now and I think people  that passed that age ( like myself) should be aware of that.

I don't know how many books  there are in this series ( 8 maybe?!), I am still at first one. I only read on days that I go to gym and arrive early, so I have little time before my class starts and that is the time I spend reading. but If you stick with it you could finish each book in 1 day,since I told you it is a small book and light reading.
In overall, they are good mystery and exciting books and I recommend reading them. Enjoy!
Mania

Wednesday, December 1, 2010

Cake Roll filled with pastry cream and fresh fruits

This is one of  the easiest and fastest cakes that involved pastry creams in my opinion. I went to a baking class for a few sessions in the summer when I was 12 years old ( it was really fun for me)  and this was one of the cakes that I learned to make there. the lady that was teaching us, had a cooking book ( written in Persian of course) called "آشپزی گلچین" which I still have and use it.
now enough with chit chat here is the recipe...

For the cake :
eggs at room temperature 6
sugar 6 tablespoon
flour 5 tablespoon
orange zest or vanilla


For the cream:
35% whipped cream 1 1/2 cup
fine sugar  1/2 cup ( if you don't have fine sugar go to the comments # 2 at the end of the post)
crushed walnuts, sliced banana and sliced pineapple (optional)

First step, heat up the oven in 300 C. take a big pan  (tray-ish pan) and cover it with wax paper.oil up the both sides of it.

Separate egg yolks and whites. in a clean bowl, mix the egg whites till they are ready ( to test it, move the bowl the egg white should not move at all). put them aside. in another bowl mix the egg yolks and sugars till they become soft yellow.add orange zests.
Very slowly pour egg yolks in the egg whites and gently mix them. after that, pour the flour little by little and gently mix  the batter.pour the batter in your pan and  spread them evenly in your pan and soften the surface.


Put it in the oven for about 15-20 minutes. be careful if you over cook it it becomes dry and it won't be easy to roll it.after it's done, take out the pan and let it cool down.

Meanwhile, you can make the cream, pour the whipped cream and fine sugar in a bowl and mix them till the cream shape up ( to check that when you take out the mixer and the cream come out with a peak).

Cover the cake with a waxing paper and roll it once just to make sure it is soft enough to roll. separate the cake form the waxing paper. cover it completely with cream, fruits and walnuts.


Roll the cake and let it cool down in the fridge.


Comments:


1- If you feel that you over cooked it and it is hard to roll it, take a clean, close to the size of your cake and slightly wet it with water. and spread the cloth on your cake and try to roll it with cloth. the moisture from the cloth helps softens the cake little.

2-Maybe you don't have fine sugars at home right now, so here is what I do all the time ( I never bought fine sugar). take sugar and put in the coffee grinder ( any type would do) grind the sugar for a few seconds and voila your fine sugar !

3- If you want you could cover the roll cake with white, chocolate cream or any other styles you like. if you want to leave it like the way I made,here is what I did. usually the side that is stick to the was papers does not come smooth as the other side of the cake. so you could turn and put the cream on the wax paper side ( of course after you removed the papers!) and leave the soft side outside. just to make everything more beautiful.

4- I did not make mine as a complete circle, but when you roll it you could adjust the shape, which I probably should have done!

Hope you try this and enjoy :)
Mania